Available for the following plans: Employment Plus, Employment Unlimited
Available for the following HR plans: Premium, Platinum
As an employee, you will need to submit timesheets if your organisation requires you to track your starting and ending times weekly. Timesheet requests allow your manager to see your starting and ending times you have submitted over the last week, so they can compare this against your contracted hours.
You can use the My Weekly Start and End Time-Based Timesheets feature to submit a timesheet with your starting and ending times you have worked for the last week, add in any breaks taken, and add any required comments. You can also use this feature to edit the information if it changes and delete a record that is no longer required.
Important
You will need to have enabled the open beta timesheet feature, Weekly Start and End Time-Based Timesheets before you can use the new features outlined in this article. You can enable this beta feature via the Beta Flask drop-down and selecting Opt-in, though remember this is still an in-development feature and subject to change. To read more on how to enable this in-progress beta feature, refer to the following article.
When approved, weekly timesheets will automatically sync over to your payroll classic platform. When this sync occurs, employees can no longer edit these entries. Only their managers and/or admins can now make changes. If an employee creates an additional timesheet entry after the sync to payroll occurs, the weekly timesheet submission will change to Processing.
Getting started
Select the payroll classic platform you integrated with for the relevant instructions. If you do not have an integrated payroll product, click the HR Only tab.
|
User Access:
|
Employee
|
Manager
|
Admin
|
We base the default access level on a per user basis and whether they have view, edit and delete access and excluding any changes made via our Custom Security feature.
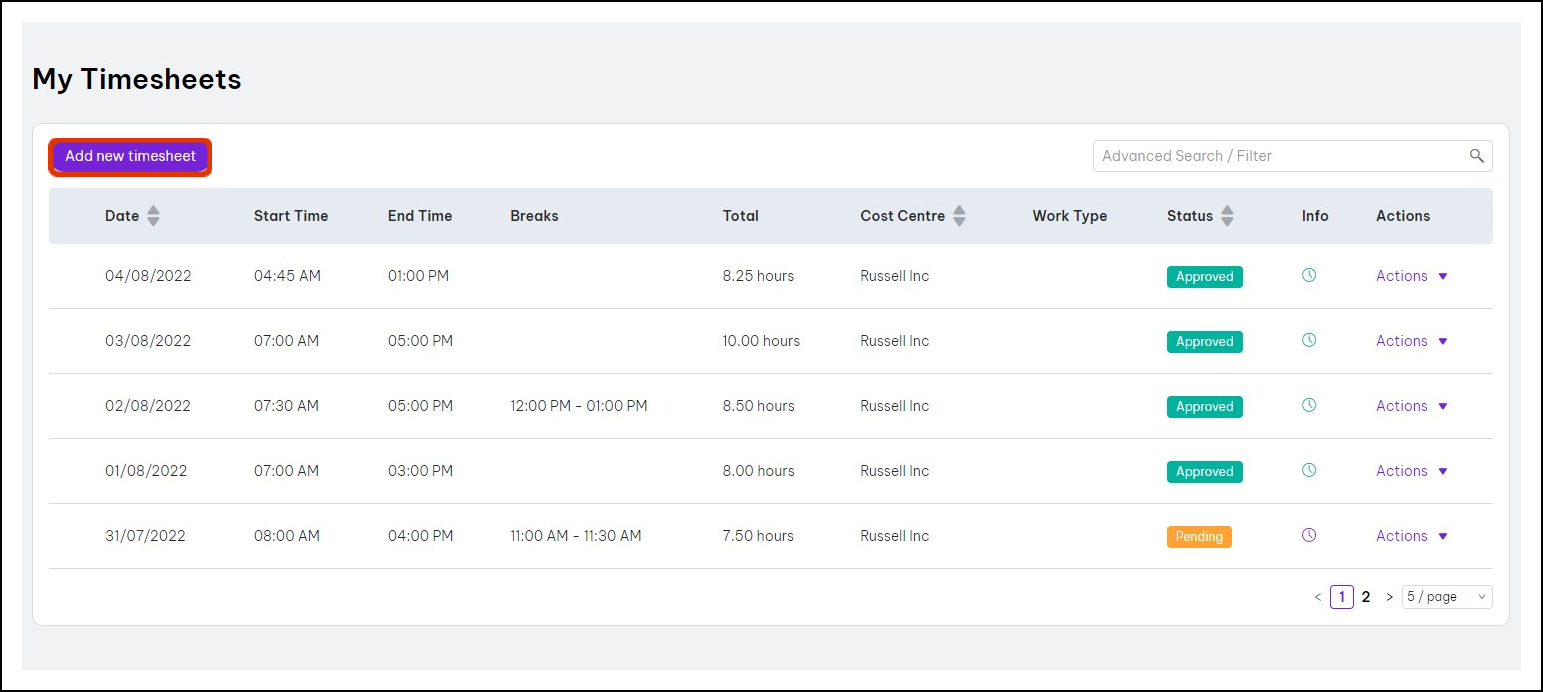
Add my weekly hours
- Click the Time menu.
- Click the Timesheet submenu.
- Click the Add new timesheet button.
- In the Week field, select the applicable timesheet period.
- Complete the following fields:
- Cost centre.
- Work type.
- Start time.
- End time.
- Break start.
- Break end.
- Comment.
- Click the Actions button.
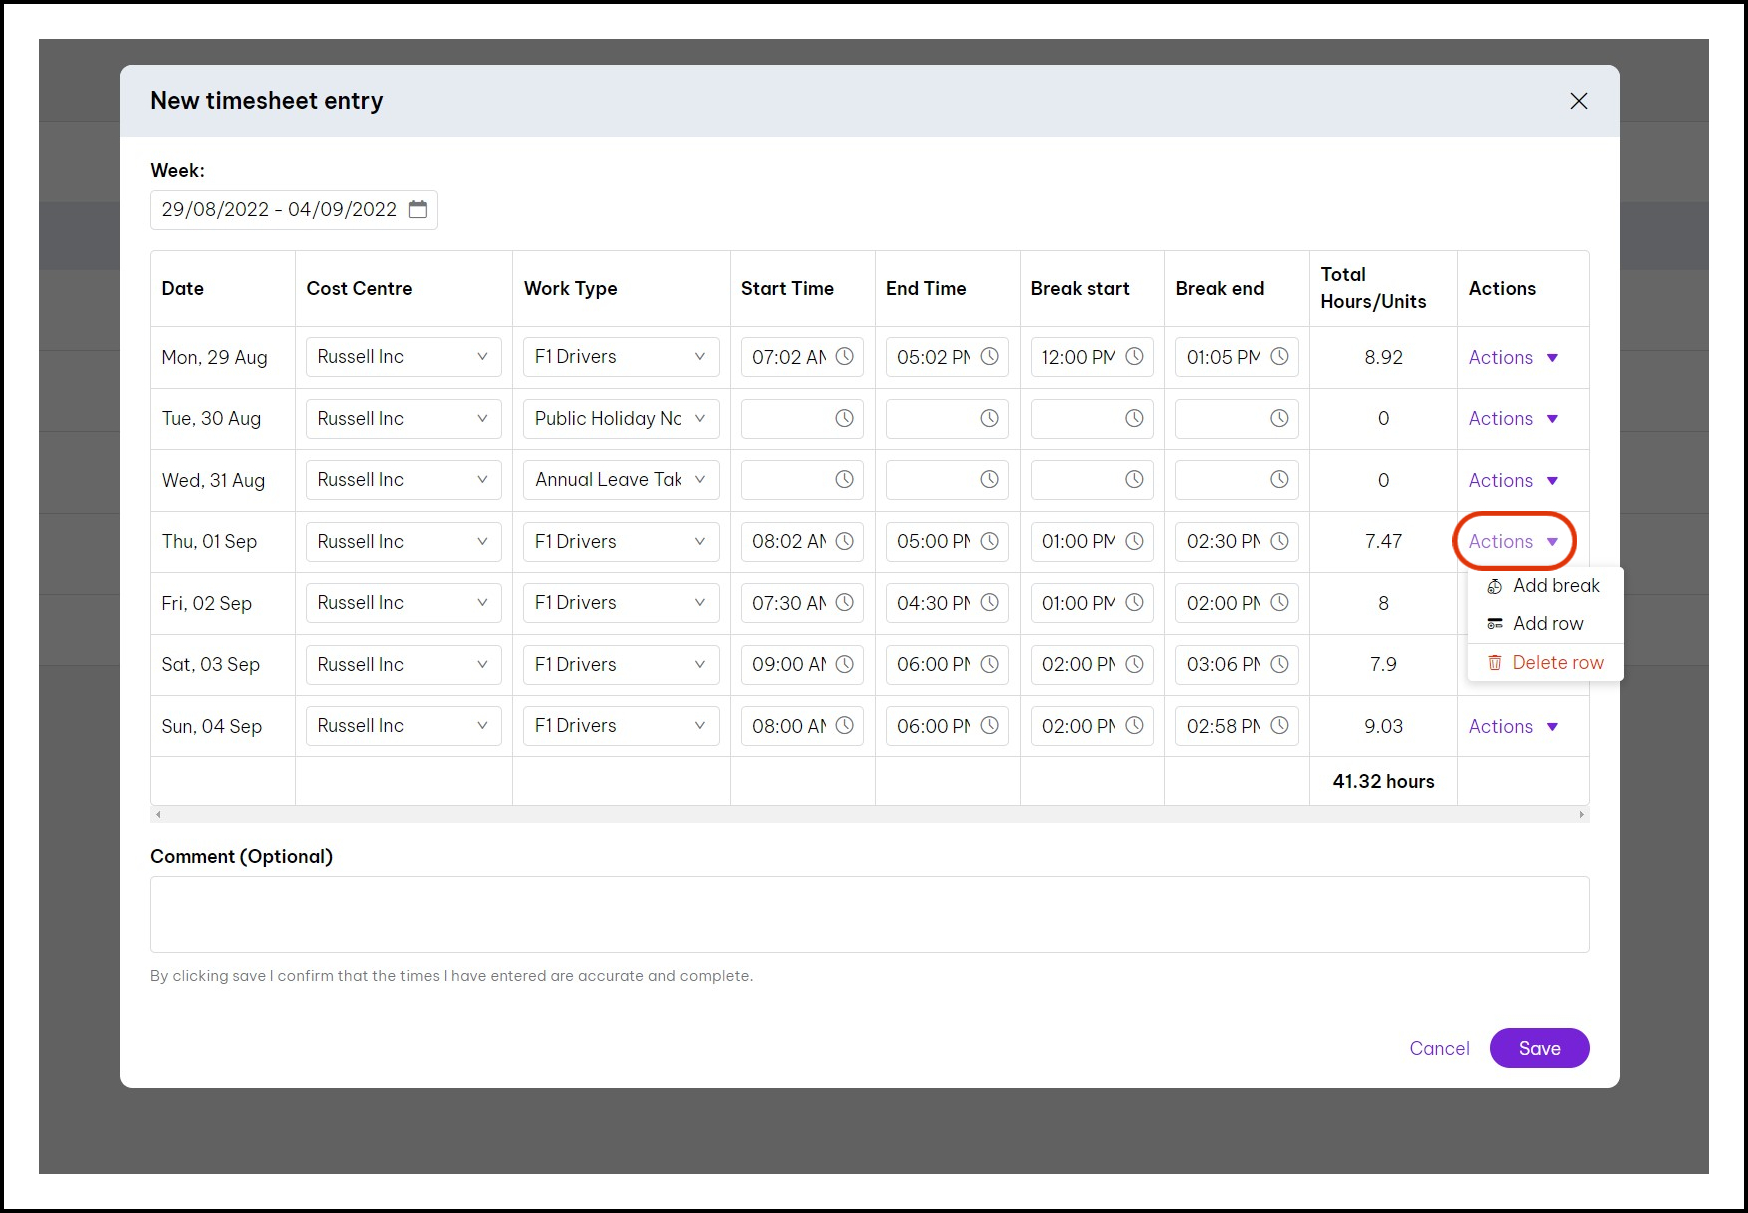
- You now have three options you can choose from with your timesheet:
- Add additional break times in:
- Click the Add Break button.
- Complete the following fields:
- Click the Save button.
- Add additional timesheet rows:
- Click the Add Row button.
- Complete the following fields:
- Cost Centre.
- Work type.
- Start time.
- End time.
- Break start.
- Break end.
- Click the Save button.
- Delete a timesheet row:
- Click the Delete Row button.
- Click the Ok button.
- Click the Save button.
|
User Access:
|
Employee
|
Manager
|
Admin
|
We base the default access level on a per user basis and whether they have view, edit and delete access and excluding any changes made via our Custom Security feature.
Add my weekly hours
- Click the Time menu.
- Click the Timesheet submenu.
- Click the Add new timesheet button.
- In the Week field, select the applicable timesheet period.
- Complete the following fields:
- Cost centre.
- Work type.
- Start time.
- End time.
- Break start.
- Break end.
- Comment.
- Click the Actions button.
- You now have three options you can choose from with your timesheet:
- Add additional break times in:
- Click the Add Break button.
- Complete the following fields:
- Click the Save button.
- Add additional timesheet rows:
- Click the Add Row button.
- Complete the following fields:
- Cost Centre.
- Work type.
- Start time.
- End time.
- Break start.
- Break end.
- Click the Save button.
- Delete a timesheet row:
- Click the Delete Row button.
- Click the Ok button.
- Click the Save button.
Maintain
Select the payroll classic platform you integrated with for the relevant instructions. If you do not have an integrated payroll product, click the HR Only tab.
|
User Access:
|
Employee
|
Manager
|
Admin
|
We base the default access level on a per user basis and whether they have view, edit and delete access and excluding any changes made via our Custom Security feature.
|
User Access:
|
Employee
|
Manager
|
Admin
|
We base the default access level on a per user basis and whether they have view, edit and delete access and excluding any changes made via our Custom Security feature.
|
User Access:
|
Employee
|
Manager
|
Admin
|
We base the default access level on a per user basis and whether they have view, edit and delete access and excluding any changes made via our Custom Security feature.
Further information
Select the payroll classic platform you integrated with for the relevant instructions. If you do not have an integrated payroll product, click the HR Only tab.
|
User Access:
|
Employee
|
Manager
|
Admin
|
We base the default access level on a per user basis and whether they have view, edit and delete access and excluding any changes made via our Custom Security feature.
Definitions: Timesheet status
| Pending |
A manager needs to approve the timesheet. |
| Approved |
A manager has approved the timesheet. |
| Declined |
A manager has rejected the timesheet. |
Definitions: Clock symbols
| Created at |
Provides a timestamp of the timesheet creation date. |
| Approved by |
Provides the name of the user that approved the request. |
| Approved at |
Provides the date and time of approval |
Definitions: Symbols
| Icon |
Name |
Description |
| |
Message |
The employer has left a note regarding this timesheet. |
|
User Access:
|
Employee
|
Manager
|
Admin
|
We base the default access level on a per user basis and whether they have view, edit and delete access and excluding any changes made via our Custom Security feature.
Definitions: Timesheet status
| Pending |
A manager needs to approve the timesheet. |
| Approved |
A manager has approved the timesheet. |
| Declined |
A manager has rejected the timesheet. |
Definitions: Clock messages
| Created at |
Provides a timestamp of the timesheet creation date |
| Synced at |
Provides a timestamp of when the timesheet tried to sync with your EH payroll classic platform. |
| Sync successful |
Show whether the synchronisation of the timesheet between your EH HR and payroll classic platform has been successful. |
| Edited at |
Provides a timestamp of the last edit done to the timesheet after a previous EH payroll classic platform synchronisation attempt. |
Definitions: Symbols
| Icon |
Name |
Description |
| |
Purple clock |
Used for approved, pending, or declined timesheets that have not synchronised with your EH payroll platform. |
| |
Green clock |
Used for approved timesheets that have synchronised with your EH payroll classic platform. |
| |
Red clock |
Used for approved timesheets that have not synchronised with your EH payroll classic platform. |
| |
Orange clock |
Used for pending, approved, or declined timesheets that have had changes made to them after synchronising with your EH payroll classic platform. |
| |
Message |
Employer has left a note regarding this timesheet. |
|
User Access:
|
Employee
|
Manager
|
Admin
|
We base the default access level on a per user basis and whether they have view, edit and delete access and excluding any changes made via our Custom Security feature.
Definitions: Timesheet status
| Pending |
A manager needs to approve the timesheet. |
| Approved |
A manager has approved the timesheet. |
| Declined |
A manager has rejected the timesheet. |
Definitions: Clock messages
| Created at |
Provides a timestamp of the timesheet creation date |
| Synced at |
Provides a timestamp of when the timesheet tried to sync with your KeyPay platform. |
| Sync successful |
Shows whether the synchronisation of the timesheet between Employment Hero and your KeyPay platform has been successful. |
| Edited at |
Provides a timestamp of the last edit done to the timesheet after a previous KeyPay synchronisation attempt. |
Definitions: Symbols
| Icon |
Name |
Description |
| |
Purple clock |
Used for approved, pending or declined timesheets that have not synchronised with your KeyPay platform. |
| |
Green clock |
Used for approved timesheets that have synchronised with your KeyPay platform. |
| |
Red clock |
Used for approved timesheets that have not synchronised with your KeyPay platform. |
| |
Orange clock |
Used for pending, approved, or declined timesheets that have had changes made to them after synchronising with your KeyPay platform. |
| |
Message |
Employer has left a note regarding this timesheet. |
Explore related content